Project 4: Web SecuritySpring 2023
Introduction
In this project, you will attack an insecure website run by the course staff with three common web-based vulnerabilities: SQL injection, cross-site scripting (XSS), and cross-site request forgery (CSRF). You are also asked to exploit various flawed defenses meant to prevent these attacks. Understanding how these attacks work will help you better defend your own web applications.
Learning Goals
- Learn to spot common vulnerabilities in websites and to avoid them in your own projects.
- Understand the risks these problems pose and the weaknesses of naive defenses.
- Gain experience with web architecture and with HTML, JavaScript, and SQL programming.
Warning
This project asks you to develop attacks and test them, with our permission, against a target website that we are providing for this purpose. Attempting the same kinds of attacks against other websites without authorization is prohibited by law and may result in severe consequences. You must not attack any website without authorization!
Target Website
Motivated by the success of DuckDuckGo, a group of freshmen CS majors decided to launch a startup named BuzzBuzzGo, with its first product being a web search engine exclusively for the Yellow Jackets. However, their investors are nervous about security problems. Unlike the freshmen who developed the site, you took cs3235, so the investors have hired you to perform a security evaluation before it goes live.
BuzzBuzzGo is available for you to test at https://webproject.gtinfosec.org. For security and compatibility reasons, the site is only accessible when using Firefox 91. You will set up a virtual machine running Kali Linux and Firefox 91 that is configured to never auto-update later in these instructions. You can interact with BuzzBuzzGo as many times as you want.
In addition to providing search results, the site accepts logins and tracks users’ search histories. It stores usernames, passwords, and search history in a MySQL database.
Passwords used on BuzzBuzzGo may be exposed to others. Never use an important password to test an insecure site! This especially includes your personal passwords.
The site replies to five main URLs: /,
/search, /login, /logout, and /create. The function of these
URLs is explained below.
-
Main page (
/)The main page accepts
GETrequests and displays a search form. When submitted, this form issues aGETrequest to/search, sending the search string as the parameter “q”.If no user is logged in, the main page also displays a form that gives the user the option of logging in or creating an account. The form issues
POSTrequests to/loginand/create. -
Search results (
/search)The search results page accepts
GETrequests and prints the search string, supplied in the “q” query parameter, along with the search results. If the user is logged in, the page also displays the user’s recent search history in a sidebar.Note: Since actual search is not relevant to this project, you might not receive any results.
-
Login handler (
/login)The login handler accepts
POSTrequests and takes plaintext “username” and “password” query parameters. It checks the user database to see if a user with those credentials exists. If so, it sets a login cookie and redirects the browser to the main page. The cookie tracks which user is logged in; manipulating or forging it is not part of this project. -
Logout handler (
/logout)The logout handler accepts
POSTrequests. It deletes the login cookie, if set, and redirects the browser to the main page. -
Create account handler (
/create)The create account handler accepts
POSTrequests and receives plaintext “username” and “password” query parameters. It inserts the username and password into the database of users, unless a user with that username already exists. It then logs the user in and redirects the browser to the main page.Note: The password is neither sent nor stored securely; however, none of the attacks you implement should depend on this behavior. You should choose a password that others will not guess, but again, never use an important password to test an insecure site!
Guidelines
To ensure consistency in project environments, we provide a virtual machine (VM) running Kali Linux and Firefox 91 specially configured to never auto-update. Follow the instructions below, depending on which architecture your computer runs.
Virtual Machine - x86-64 Hosts
This section is for nearly all Windows and Linux machines, and Macs with Intel processors. If you have an Apple Silicon Mac (M1 or M2), read the guide below for aarch64 hosts.
Project 4 must be completed within this VM. Both Kali Linux and Firefox are configured not to auto-update, but do not manually update any software in this VM! We cannot guarantee your solutions on an updated configuration will work the same way during autograding.
It is your responsibility to set enough disk space aside on your personal device for all course material, including this VM. If disk space is scarce, you may want to consider migrating your data to the GT OneDrive or to an external storage medium. OneDrive provides 1 TB of storage to students. Except in the most extenuating circumstances, the course staff are not able to provide accommodations due to a lack of space and/or loss of data.
Last but not least, if you run into any problems while reading this guide, there are troubleshooting tips at the bottom of this section. We will update this document continually as we encounter new problems or parts where many people are struggling on.
Step 1 - Download the VM and VirtualBox
Download the VM appliance for x86-64 hosts cs32356035vm-x8664.ova from here. You’ll need to sign in with your GT credentials.
The SHA-256 checksum of this appliance is b0f623cfa2445a1187b1e7aeed12e06a4792ab76bea99882ba41e3ca80891adf.
You will use VirtualBox to run this VM. Download the latest version
for your host operating system here.
Step 2 - Import the VM Appliance
In VirtualBox’s main menu, navigate to Tools, and then Import. Select the
VM appliance file (cs32356035vm-x8664.ova) which you downloaded, and continue to click
the Next button until you are no longer prompted; you do not need to modify
any settings. Simply verify that your default settings look like the image below:
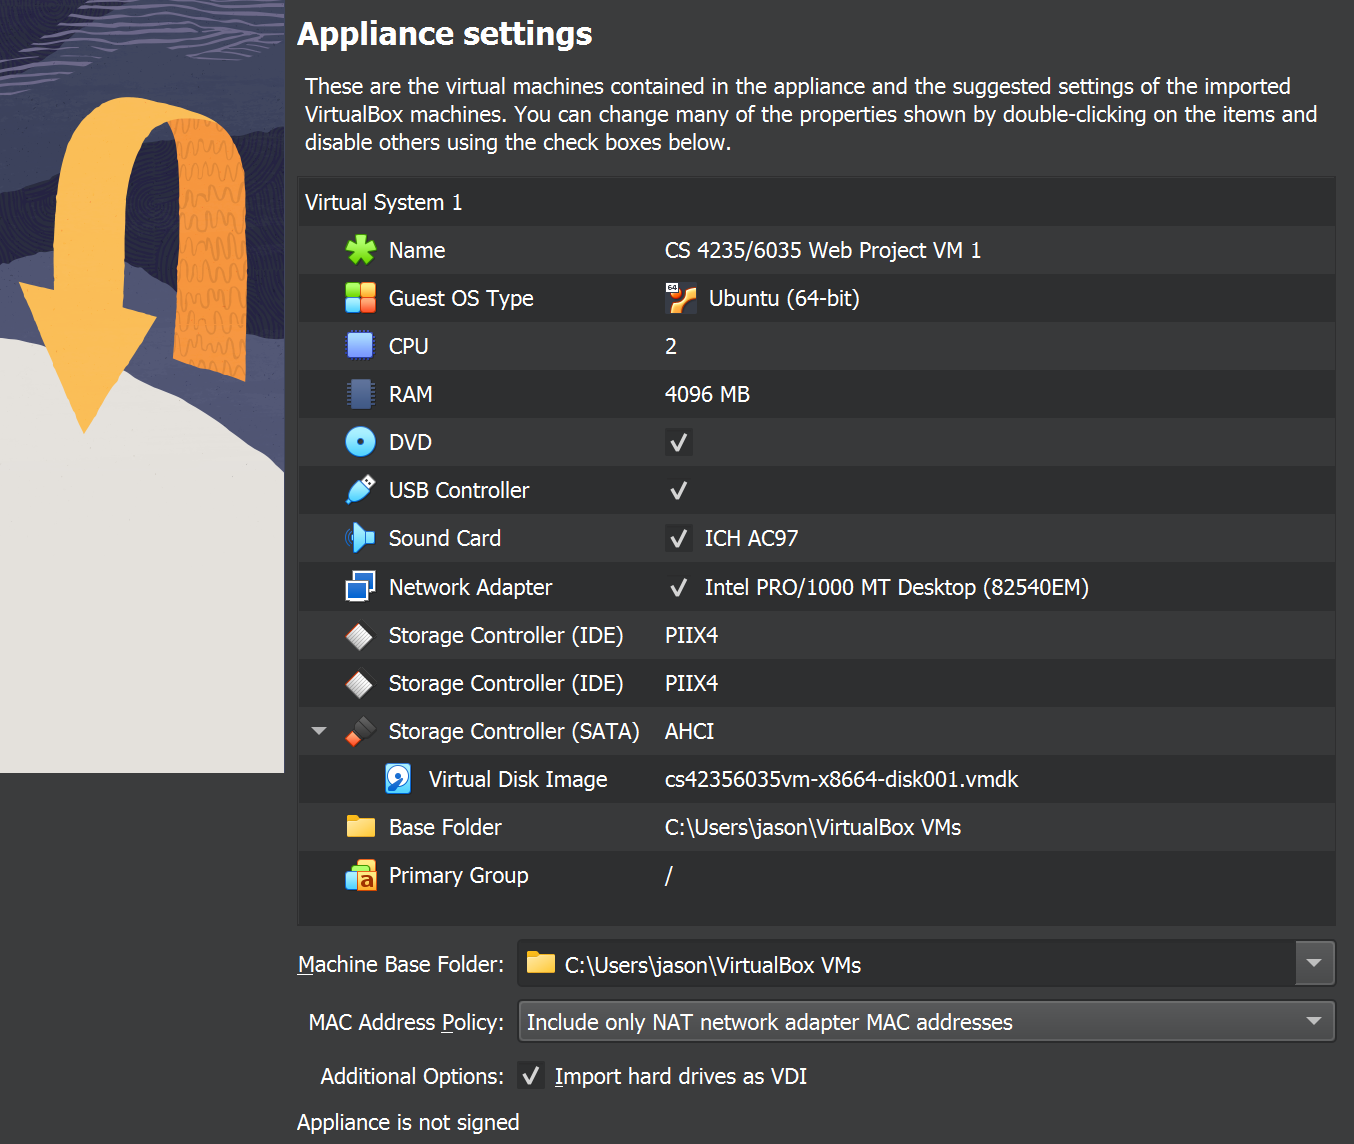
The import process may take several minutes. Once complete, run the VM.
The password to the user gtinfosec is also gtinfosec.
Once you’re logged in to the desktop, you can launch Firefox from the dock
to the left of your screen. We’ve modified this to be Firefox 91.
Troubleshooting - CPU Virtualization
VirtualBox requires an x86(-64) processor with hardware-assisted virtualization; such feature is called VT-x on Intel processors and AMD-V on AMD processors. If you have a Mac, virtualization should be enabled by default in firmware. If you have a PC, chances are the feature will be enabled from the factory, yet this is not always the case.
In order to enable virtualization, you will need to enter the setup menu of your BIOS or UEFI on your PC. The key combination to press immediately after startup differs by PC manufacturer, but oftentimes it is one of F2, Delete, F10, F12, or Esc. Consult your manufacturer’s documentation if you are unsure. The location of the setting will also differ by manufacturer. However, the name will almost always include ‘virtualization’ or ‘virtualization technology’.
Troubleshooting - Downloading the VM Appliance
Depending on your web browser’s configuration such as extensions or add-ons geared towards privacy, the VM Appliance download from OneDrive may fail in the middle. If this happens repeatedly, we recommend downloading from incognito mode with all extensions disabled, or downloading another web browser.
Troubleshooting - Installing VirtualBox on Windows 11 Hosts
We’ve received reports that on some Windows 11 hosts, VirtualBox may fail to install, asking for Microsoft Visual C++ 2019 to be installed beforehand. You can download this here.
Troubleshooting - Error While Importing
If you have a previous installation of VirtualBox 6, we’ve confirmed that this can cause an error saying “Invalid value ‘WAS’ in AudioAdapter/@driver attribute” when importing the VM appliance, causing the import operation to fail. Please update to VirtualBox 7 using the download link above.
Virtual Machine - aarch64 Hosts
This section is for Apple Silicon Macs (M1 and M2) only. If you have an Intel-based Mac or a Windows or Linux PC, read the guide above for x86-64 hosts.
Project 4 must be completed within this VM. Both Kali Linux and Firefox are configured not to auto-update, but do not manually update any software in this VM! We cannot guarantee your solutions on an updated configuration will work the same way during autograding.
It is your responsibility to set enough disk space aside on your personal device for all course material, including this VM. If disk space is scarce, you may want to consider migrating your data to the GT OneDrive or to an external storage medium. OneDrive provides 1 TB of storage to students. Except in the most extenuating circumstances, the course staff are not able to provide accommodations due to a lack of space and/or loss of data.
Last but not least, we’ll update the bottom of this section continually with troubleshooting tips as we encounter new problems or parts where many people are struggling on.
Step 1 - Download the VM and UTM
Download the VM appliance for Apple Silicon hosts cs32356035vm-aarch64.utm.tar.xz from here. You’ll need to sign in with your GT credentials.
The SHA-256 checksum of this appliance is 82cc9740b664df5ae065c976c3077044425b5cf6c62a15dba2f775987ef912a3.
Then, unzip the VM appliance with tar -xJvf cs32356035vm-aarch64.utm.tar.xz. This should create a new unzipped file named cs32356035vm-aarch64.utm in the same directory.
On macOS, we will use a program called UTM to run the VM.
Download UTM from here
and move the application to your Applications folder (/Applications) for future use.
Step 2 - Import the VM Appliance
Double-click the unzipped cs32356035vm-aarch64.utm file in your Finder, which should
open UTM to a screen similar to the following:
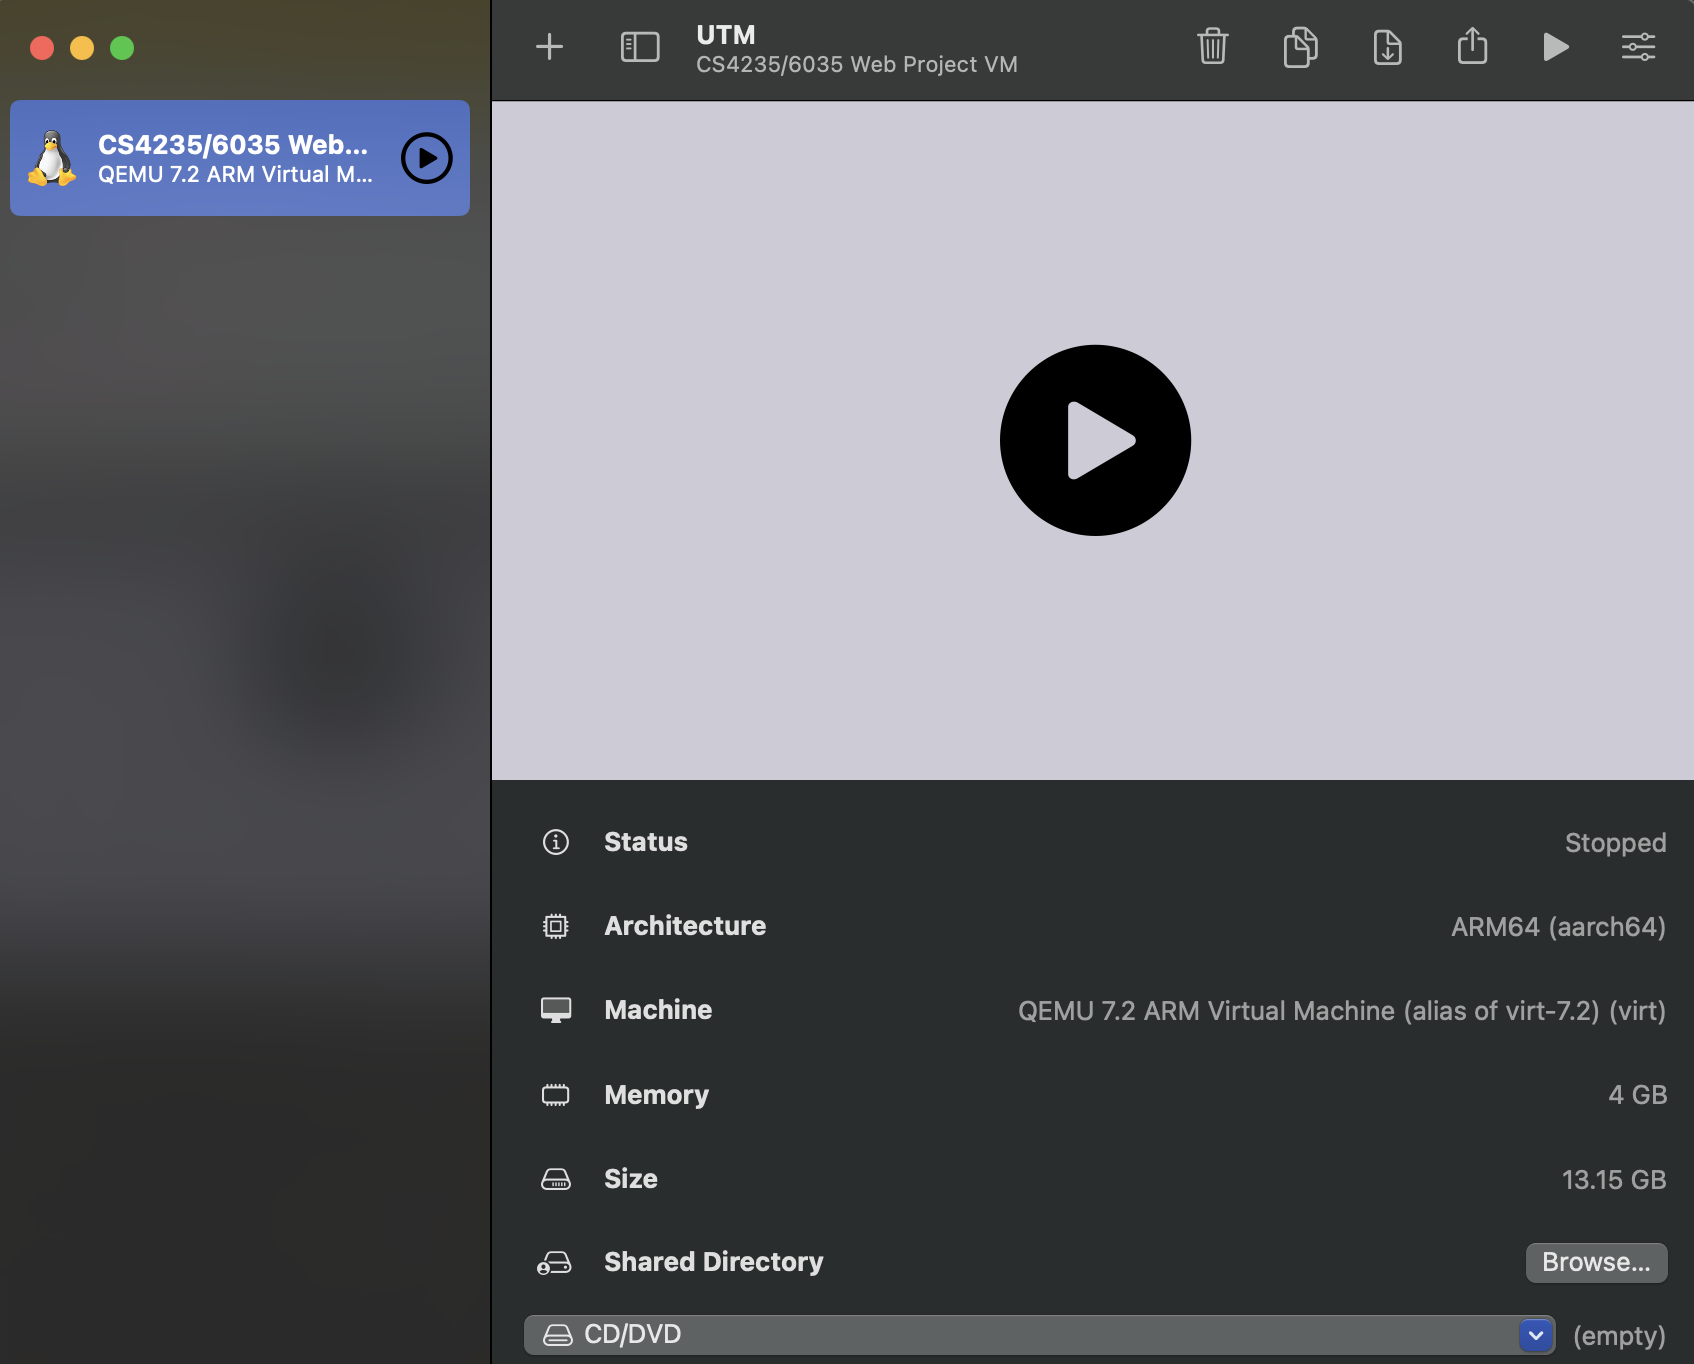
After clicking run (any of the three play buttons found in the above screenshot will work),
the VM will boot into the login screen.
he password to the user gtinfosec is also gtinfosec.
Once you’re logged in to the desktop, you can launch Firefox from the dock
to the left of your screen. We’ve modified this to be Firefox 91.
Troubleshooting - Downloading the VM Appliance
Depending on your web browser’s configuration such as extensions or add-ons geared towards privacy, the VM Appliance download from OneDrive may fail in the middle. If this happens repeatedly, we recommend downloading from incognito mode with all extensions disabled, or downloading another web browser.
Starter Files
Within the Kali Linux VM, clone the template repository for the starter files with:
sudo apt install -y git
git clone https://github.com/CS-4235-6035-Restructuring/webproject-starterfiles.git
Since this is a template repository, you can fork it and push commits there as you work for version control. If you create your own fork, please ensure that you have made it private.
To bundle your submission, run ./make_submission.sh. This script creates submission.tar.gz, which you’ll upload to the Gradescope assignment for the project code.
For more details, refer to the Submission Details section at the bottom of this spec.
Please note that this project does not have a public-facing autograder. That is, Gradescope will say “this assignment does not have an autograder configured”. However, for each target, it is trivial to test if you have exploited it correctly, and thus if you will get credit for each target. For more detailed information, see the success criteria for each of the targets below (keep reading!).
Defense Levels
The freshmen have been experimenting with some naïve defenses, and you need to demonstrate that these provide insufficient protection. In Parts 2 and 3, the site includes drop-down menus at the top of each page that let you change the CSRF and XSS defenses that are in use. When you are testing your solution, ensure that BuzzBuzzGo has the correct defense levels set. You may not attempt to subvert the mechanism for changing the level of defense in your attacks. Be sure to test your solutions with the appropriate defense levels!
In all parts, you should implement the simplest attack you can think of that defeats the given set of defenses. In other words, do not simply attack the highest level of defense and submit that attack as your solution for all defenses. You do not need to combine the vulnerabilities, unless explicitly stated.
When grading, the correct defense levels will be set on BuzzBuzzGo before the autograder runs your solution; don’t worry about setting this through your code.
Resources
The Firefox Developer Tools will be very helpful for this project, particularly the JavaScript console and debugger, DOM inspector, and network monitor. See https://developer.mozilla.org/en-US/docs/Tools. You can enable developer tools by pressing F12, or right-clicking on any element of the page and choosing Inspect from the dropdown menu. Firefox’s developer tools, when enabled, appears at the bottom of the browser window by default. You can adjust the text size within the developer tools frame by clicking anything on it, and then pressing (Ctrl, +) for larger text and (Ctrl, -) for smaller text.
Although general purpose tools are permitted, you are not allowed to use tools that are designed to automatically test for vulnerabilities. Additionally, your solutions may not use any libraries other than jQuery, which has already been included on BuzzBuzzGo.
Your solutions will involve manipulating SQL statements and writing web code using HTML, JavaScript, and the jQuery library. You should search the web for answers to basic how-to questions. There are many fine online resources for learning these tools. Here are a few that we recommend:
- SQL Tutorial
- SQL Statement Syntax
- Introduction to HTML
- JavaScript 101
- Using jQuery Core
- jQuery API Reference
- HTTP Made Really Easy
To learn more about SQL Injection, CSRF, and XSS attacks, and for tips on exploiting them, see:
Primers
To help you get started on the background knowledge needed for this project, we’ve recorded a series of primer videos, one for each part:
You can also download a PDF of the slide deck for all three videos here; you’ll need to sign in with your GT credentials.
Part 1. SQL Injection
Your first goal is to demonstrate SQL injection attacks that log you in
as an arbitrary user without knowing the password. In order to protect
other students’ accounts, we’ve made a series of separate login forms
for you to attack that aren’t part of the main
BuzzBuzzGo site.
For each of the following defenses, provide inputs to the target login
form that successfully log you in as the user “victim”:
1.0 No defenses (3 points)
You can assume that the password field is simply enclosed in single quotes.
Target: https://webproject.gtinfosec.org/sqlinject/0
Submission: sql_0.txt
1.1 Simple escaping (3 points)
The server escapes single quotes (') in the inputs by replacing
them with two single quotes.
Target: https://webproject.gtinfosec.org/sqlinject/1
Submission: sql_1.txt
1.2 Escaping and Hashing (3 points)
The server uses the following Python code, which escapes the username and applies the MD5 hash function to the password.
from hashlib import md5
from flask import request
@app.route("/sqlinject/2", methods=["POST"])
def login():
    username = request.form["username"]
    escaped_username = mysql_real_escape_string(username)
    password_bytes = request.form["password"].encode("latin-1")
    password_digest = md5(password_bytes).digest().decode("latin-1")
    query = "SELECT * FROM users WHERE username='" + escaped_username + "' AND password='" + password_digest + "'"
    selected_users = mysql.execute(query).fetchall()
    if len(selected_users) > 0:
        return "Login successful!"
    else:
        return "Incorrect username or password."
This is more difficult than the previous two defenses. You will need to write a program to produce a working exploit. You can use any language you like, but we recommend Python 3.
Hint: If you are using a hex digest to see if the hash contains your target string, be very careful of where you find the string within your hash. With a hex digest, two characters correspond to one byte. Consequently, if the index is odd, the characters will not be in the correct position to be interpreted byte by byte.
One more hint: regular expressions may be useful here instead of searching for fixed strings. The shorter your search criterion is, the shorter you can expect your program to take to find a valid input. We encourage you to inspect SQL semantics and see which types of statements evaluate as true before writing your program.
Target: https://webproject.gtinfosec.org/sqlinject/2
Submissions: sql_2.txt and a directory called sql_2-src/
containing your program (since we only check the latter for
proof of work, it does not matter how many files there are
in the directory or what the files are named.)
What to submit
For 1.0, 1.1, and 1.2, when you successfully log in as victim, the
server will provide a URL-encoded string of your form inputs. Submit a
text file with the specified filename containing only this string. For
1.2, also submit the source code for the program you wrote by placing it
in the directory sql_2-src.
Part 2. Cross-site Scripting (XSS)
Your next task is to demonstrate XSS attacks against the
BuzzBuzzGo search
box, which does not properly filter search terms before echoing them to
the results page. For each of the defenses below, your goal is to
construct a URL that, when loaded in the victim’s browser, correctly
executes the specified payload. We recommend that you begin by testing
with a simple payload (e.g., alert(0);), then move on to the full
payload. Note that you should be able to implement the payload once,
then use different means of encoding it to bypass the different
defenses.
Note: jQuery is embedded on BuzzBuzzGo. Please do not reload it in your scripts for Part 2.
Payload
The payload (the code that the attack tries to execute) will steal the username and the most recent search the real user has performed on the BuzzBuzzGo site. When a victim visits the URL you create, these stolen items should be sent to the attacker’s server for collection.
For purposes of grading, your attack should report these events by
loading (i.e. sending a GET request to) the following URL:
http://localhost:31337/?stolen_user=username&last_search=last_search
That is, the files named xss_#.txt should contain a URL only. When this
URL is copy-pasted into Firefox’s address bar, the attack (as described above)
should succeed. In turn, when you observe your payload working correctly from
BuzzBuzzGo‘s /search endpoint, it suffices to copy-paste the URL in Firefox’s
address bar to the corresponding text file for your current defense level.
You can test receiving this data by running this command at the shell in your project directory:
$ python3 -m http.server -b 127.0.0.1 31337
and observing the HTTP GET request that your payload generates in the server log.
For full credit, make sure your payload functions exactly as specified above. We cannot accept solutions that load an incorrect URL, use an incorrect request method, or send extraneous data.
Hint: If your XSS inject works when you type it into the console but not when you search it from BuzzBuzzGo, this is all about timing. Because the search history is tied to your account, BuzzBuzzGo may have to make another request to its backend server once the DOM loads. You will want to ensure your code is not called until everything in the DOM is ready.
Defenses
There are four levels of defense. In each case, you should submit the simplest attack you can find that works against that defense; you should not simply attack the highest level and submit your solution for that level for every level. Try to use a different technique for each defense. The Python code that implements each defense is shown below, along with the target URL and the filename you should submit.
Note that the defenses are not cumulative; 2.2, for example, does not cover the sanitation done for 2.1.
2.0 No defenses (4 points + 1 point payload)
Target: https://webproject.gtinfosec.org/search?xssdefense=0
Submission: xss_0.txt
For 2.0 only, also submit a human-readable version of your payload
code (as opposed to the form encoded into the URL). Save it in a
file named xss_payload.html.
2.1 Remove “script” (4 points)
The server runs the Python code below to sanitize user input. In plain English, this regular expression replaces all instances of “script” with empty strings.
filtered = re.sub(r"(?i)script", "", input)
Submission:
xss_1.txt
2.2 Remove several tags (4 points)
The server runs the Python code below to sanitize user input. In plain English, this regular expression replaces all instances of the opening tags of script, img, body, style, meta, embed, and object HTML elements with empty strings.
filtered = re.sub(r"(?i)script|<img|<body|<style|<meta|<embed|<object", "", input)
Submission:
xss_2.txt
2.3 Remove some punctuation (4 points)
The server runs the Python code below to sanitize user input. In plain English, this regular expression replaces all semicolons, single quotes, and double quotes with empty strings.
filtered = re.sub(r"[;'\"]", "", input)
Target: https://webproject.gtinfosec.org/search?xssdefense=3
Submission: xss_3.txt
What to submit
In addition to the the human-readable (non–URL-encoded) payload submitted
for part 2.0, your submission will be a text file with the specified filename
for each level of defense that contains a single line consisting of a URL. When
this URL is loaded in a victim’s browser, it should execute a payload against
the specified target. The payload encoded in your URLs may embed inline JavaScript. That is,
it should include the localhost URL given
earlier in this spec!
Part 3. Cross-site Request Forgery (CSRF)
Your final goal is to demonstrate CSRF vulnerabilities against the login
form, and BuzzBuzzGo has
provided two variations of their implementation for you to test. Your
goal is to construct attacks that surreptitiously cause the victim to
log in to an account you control, thus allowing you to monitor the
victim’s search queries by viewing the search history for this account.
For each of the defenses below, create an HTML file that, when opened by
a victim, logs their browser into BuzzBuzzGo under
the account “attacker” and password “l33th4x”.
Your solutions should not require any user action beyond simply loading the page once. That is, your code should not rely on user input. The browser should just display a blank page, with no evidence of an attack. (If the victim later visits BuzzBuzzGo, it will say “logged in as attacker”, but that’s fine for the purpose of this project. After all, most users won’t notice immediately.)
To test your solution, you will have to act like the victim. With BuzzBuzzGo
open in Firefox, open a new tab. Pressing (Ctrl, O) will prompt Firefox to
open a file, and this is where you can select your csrf_#.html.
3.0 No defenses (5 points)
Target: https://webproject.gtinfosec.org/login?csrfdefense=0&xssdefense=4
Submission: csrf_0.html
3.1 Token validation (5 points)
The server sets a cookie named csrf_token to a random 16-byte
value and also includes this value as a hidden field in the login
form. When the form is submitted, the server verifies that the
client’s cookie matches the value in the form. You are allowed to
exploit the XSS vulnerability from Part 2 to accomplish your goal.
Target: https://webproject.gtinfosec.org/login?csrfdefense=1&xssdefense=0
Submission: csrf_1.html
What to submit
For each part, submit an HTML file with the given name that accomplishes the specified attack against the specified target URL. The HTML files you submit may embed inline JavaScript. If you decide to use jQuery for your HTML file, make sure to import it!
Note: Since you’re sharing the attacker account with other students,
we’ve hard-coded it so the search history won’t actually update. You can
test with a different account you create to see the history change.
Tips and advice
In the past, students have lost credit on this part for various preventable reasons. Here are some tips on how to avoid common pitfalls:
-
Double check to make sure you use the exact target endpoints specified.
-
Do not rely on JavaScript methods that force the script to sleep for a hard-coded time interval, as this approach may not work consistently across all situations.
-
When obtaining cookie data, avoid hardcoding any values beyond those given above. Search online to find general best practices for these tasks.
-
Your solution must work quickly and discreetly to evade detection. This means no automatic redirects, in any part of your HTML page or in any of its frames.
-
Apply the security mindset and test your exploit thoroughly, multiple times just to be safe! Make sure to clear any cookies and disable any extensions that may interfere.
Part 4. Writeup: Better Defenses
For each of the three kinds of attacks (SQL injection, XSS, and CSRF), write a paragraph of advice for the BuzzBuzzGo developers about what techniques they should use to defend themselves. Keep in mind that, as a burgeoning startup, BuzzBuzzGo is working on multiple other products, so make sure your advice is general and applies to more than just their demo website.
What to submit
Please submit your security recommendations as a 1-page PDF to the Gradescope assignment for the writeup submission. This writeup is worth 6 points.
Submission Details
Within the Kali Linux VM, navigate to the directory with the starter files which now have your work. Run ./make_submission.sh to make your submission, and submit submission.tar.gz to the Gradescope assignment for the code submission.
Ensure the following items are completed and submitted by the deadline (the maximum score is 42 points):
Part 1: SQL Injection
| 1.0 No defenses (3 points) | |
| 1.1 Simple escaping (3 points) | |
| 1.2 Escaping and Hashing (3 points) | |
| 1.2 Escaping and Hashing |
Part 2: XSS
| 2.0 No defenses (1 point) | |
| 2.0 No defenses (4 points) | |
| 2.1 Remove “script” (4 points) | |
| 2.2 Remove several tags (4 points) | |
| 2.3 Remove some punctuation (4 points) |
Part 3: CSRF
| 3.0 No defenses (5 points) | |
| 3.1 Token validation (5 points) |