Project 1: Software SecuritySpring 2023
Learning Goals of This Project:
Students will learn introductory level concepts about binary exploitation. This lab develops understanding of control flow hijacking through different tasks/challenges designed to show certain vulnerabilities or weaknesses in a C program. A python library pwntools will be used to show some exploitation techniques and automation to successfully hack a program.
The Final Deliverables:
A single json formatted file will be submitted to Gradescope. This file should be named project_ctf.json. A template can be found in the Home directory.
See Submission Details for more information.
Project Premiere:
- This Intro Video shows how to automate some exploits and use our exploit framework on the VM.
- If you’re an absolute beginner with no Linux experience, This Website may be able to help.
- pwntools Documentation
- GDB command cheat sheet
Submission:
Gradescope (autograded) - see Submission Details.
Virtual Machine:
(Note: downloads can be very slow when the project first releases due to very high traffic in the first few hours/day.)
- Parallels VM for Apple Silicon systems:
- You can install Parallels Desktop for Mac here.
- VM Download
- Username:
parallels, Password:password
- Intel/AMD x64 version (we suggest using 6.1.16, but you can try any version if already installed):
- VM Download
- Download VirtualBox 6.1.16 for Windows here.
- Download VirtualBox 6.1.16 for Mac here.
- Username:
cs3235, Password:cs3235
- Note: there is no root permissions on the VM.
00_intro
Step 1: Open a terminal and navigate into the project directory project_ctf/00_intro.
$ cd ~/project_ctf/00_intro
Inspect the contents of the readme file:
$ cat readme
Follow the instructions in the readme to modify e.py with your GTID (9 digit numeric school ID number that looks like 901234567), and afterwards execute the script to get your first flag! Your output will look like this. Copy this submission hash and place in the json file in your home directory: ~/project_ctf.json.

Submit your firsst flag to make sure it works before continuing!
Also, it is a very good idea to submit each flag you get to make sure it works before moving on - in case of any issues.
Applicable for all flags: If for whatever reason you don’t get a flag and you’re positive you should, try running the exploit once or twice. The flag generator can have some unexpected behaviors. When in doubt, make a private post in Piazza to ‘All Instructors’, and we will assist you if possible.
01_buffer_overflow_1
Please watch the intro video first. If you would like to try the experimental instruction program BoxxY and you have an Intel/AMD machine, see the Appendix for details.
This task is a very simple buffer overflow that, upon inspection, will check if a variable is non-zero. Using the information you have gathered from reading and the videos, it is your task to get this program to get to the call_me() function, and get the flag printed.
Note: you are free to use GDB if you need to for this project, but you need to run the program on the command line (i.e. ./e.py) in order to get the real flag for submission!
01_buffer_overflow_2
In this task, you will learn details about binaries compiled from C code, and how some basic things can be exploited such as process redirection or control flow hijacking. The steps in this flag are discussed in-depth in the intro video.
In this directory you have an executable binary named flag which is vulnerable to a buffer overflow in one of its functions. We will be using an exploitation library called pwntools to automate some of the overflow techniques and get the binary to call a function it otherwise would not have. This function called call_me generates a key using your Gradescope User ID to get a valid flag that will pass the autograder.
Now, we will run the binary, just to see what the program is doing:
$ cd ~/project_ctf/01_buffer_overflow_2
$./flag

We see the binary is asking for a string. Input any text you want or just press enter, and you’ll see that the program does nothing and exits. That’s just to simplify the code so we can focus on the exploit.
The binary is statically linked to a shared object which has a lot of methods that construct the key, and has a simple function called call_me() which will print out your key.
This is where we will start learning about binary file formats. Without going into a deep dive about program structure, operating systems, compilers, assembly language, machine code, etc., you will still be able to understand that there are two key aspects of binary exploitation.
- Data
- Data is just any collection of bits that represent some type (like an ASCII character, integer value, pointer, etc.)
- Addresses
- At this scope, we can just think of addresses as fully unique identifiers of specific data elements. These are logical locations the computer understands.
A buffer overflow occurs when too much data is fed into an unprotected (or poorly protected) data buffer. 64-bit C programs work like the following: a small amount of bytes past the beginning of the stack frame, data is stored at an address called the Instruction Pointer, which is a register pointing to the currently executed instruction. If we override this with a valid address, we can manipulate the control flow of the program and have it execute arbitrary (or otherwise unintended) code with a well-formed attack. Starting off easy, we are going to modify e.py and learn a few basics of the pwntools library.
Open e.py with your favorite text editor, and analyze the content and comments.
Once you understand what they do, proceed to fill in the cyclic size (this number is up to you based on your understanding of the program and what would break it) to get a segmentation fault message by running
$ ./e.py dbg
This will open up a gdb terminal with a breakpoint set at main().
Type c to continue from the breakpoint. Sometimes you may need to press c twice if you don’t see the error; this is an issue with how gdb attaches to processes.
Note: The screenshot below is taken from a system with an x86-64 CPU. For ARM CPUs such as Apple Silicon, the number of registers and individual register names will differ. See ARM Documentation.
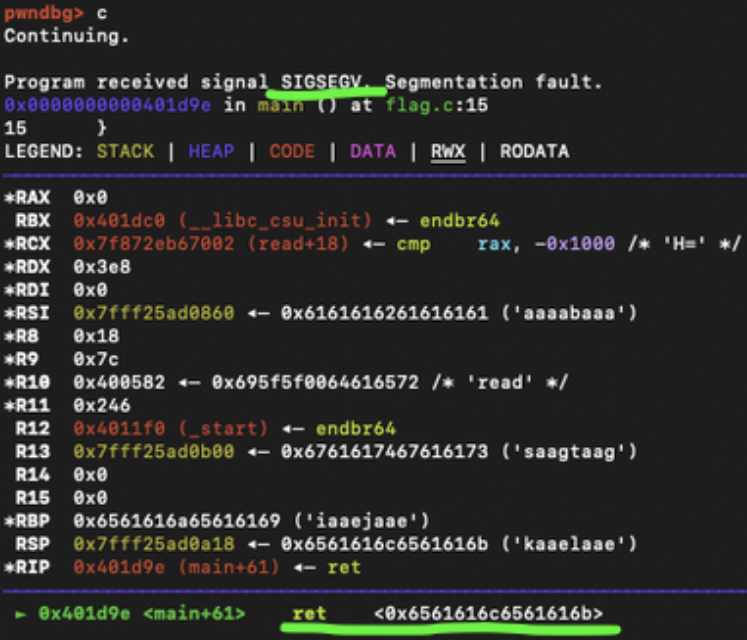
We see the program received an interrupt signal for a SEGMENTATION FAULT (SIGSEGV, or an invalid access to memory). This happens when the program tries to access memory at a certain location that it either isn’t allowed to access, or doesn’t exist. In this case, the return address for the function was overwritten by cyclic()’s data in the form of long strings of characters. Pay attention to the bottom of the screenshot where the instruction pointer is currently trying to ret (return) to 0x6561……616b, which is just a string of ASCII characters in hexadecimal form.
Now that we know how to break the binary, let’s figure out how to purposefully break it. Using a pwntools method called cyclic_find() we enter in the bottom 32 bits (4 bytes) of the return string (0x6561616b in this example) which will give the number of characters before reaching that value. This is important because we are now going to reach our first step of control flow hijacking by overflowing enough data, such that we can place a value and change the course of the program’s normal path.
In e.py, on the commented line below your cyclic command, we are now going to use cyclic_find() which will automate our buffer length calculation, and feed that number into cyclic(). Place in your 4 character bytes (preceded by a 0x, like 0x6561616b). Uncomment the two lines beneath our original cyclic() call, and fill in the hex value described above. This will fill the buffer with our calculated buffer length, appended by the ASCII byte equivalent of the variable by using another pwntools method p64(<string>).
After you have done that, rerun
./e.py dbg
And hit c.

If done correctly, you should see something like this screenshot, where if you check the ret instruction, we are now failing on an invalid access to our dummy address.
Stepping away from the pwntools library for a moment, we now need to find something usable within the binary that will allow us to actually call a function, or do something other than just crashing the program.
Now we will use a linux command objdump, which takes a binary file and will output a dump of the binary. This dump will give some key information about the binary. The -D flag will output binary addresses, machine code, and assembly code of the binary to stdout, which you can redirect into a file.
objdump -D flag > flag.asm
Then open flag.asm.
You will see a bunch of (likely) confusing information that, at a high level, translates to the code that you can see in the flag.c file. You won’t need to go through this file in any extreme expense (unless you want to?). We are just going to focus on finding an address within the binary file that holds the machine code responsible for making a function call to call_me().
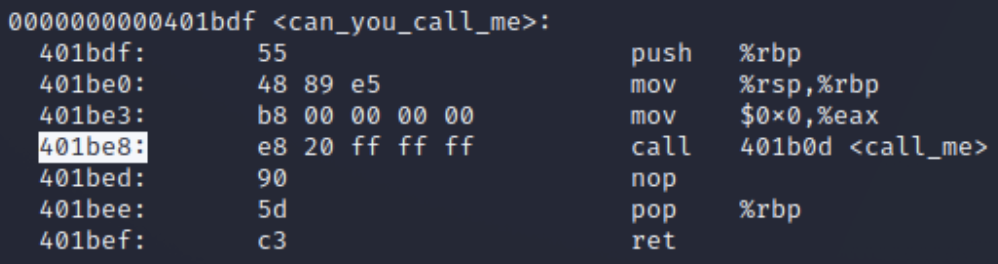
Search for the string call_me in flag.asm and keep looking until you find the following assembly instruction:
For Intel/AMD CPUs:
call <some address> <call_me>
Note down the highlighted address showing the call (it will be different in your binary).
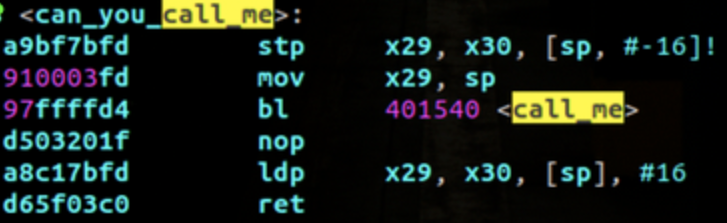
For ARM CPUs (e.g. Apple Silicon):
bl <some address> <call_me>
The command will be a bl (branch and link) that looks like this.
Now open e.py and adjust the line:
payload += p64( 0xdeadbeefdeadbeef )
With the hexadecimal value of the address above (again, prepend 0x to the value highlighted).
Now run ./e.py again from the command line (without dbg) and check the terminal output.
Did you get it? Awesome! Submit your first flag to Gradescope (follow the Appendix for more details.)
- If not, retrace your steps in this task and also make sure you used the
call call_meaddress in the earlier step and not the address of the actual functioncall_me().
02_assemble_the_assembly
This task will get you to determine which assembly instructions will properly construct a call using the address of the call_me() function (the actual address of the function, as opposed to task 1 which needed the call to a function). Analyze the different instructions and look up the usage/behavior of them to figure out which one will construct the address.
You can use objdump or gdb to find the address of call_me() and figure out how you calculate it.
For debugging, we highly recommend using gdb, setting a breakpoint on the gadget function (b <func>), and stepping through the options once you think you know the correct path to get to the function call.
(FYI: you don’t have to use pwntools for this one.)
02_bad_rando
This program (very conveniently) leaks out part of the libc base address.
- This address is randomized via ASLR (Address Space Layout Randomization), so it will change a little bit every time the program is launched.
- Run the program a few times. and notice which bytes are different and which ones aren’t.
Next step will be analyzing the C file and see what we are comparing against in order to get to call_me:
system()is alibcfunction. use GDB to get the address ofsystemusingp system.- Run
./flagmultiple times; it will ask you for input and your goal is to guess an address. Put in any random guess and try it a few times to see if you can notice a pattern as to what is leaked and what is being expected.
Fortunately there’s only one byte that is missing from our formula, so we can do some scripting in Python to try out the remaining values.
pwntoolshas a function calledrecv<line|until|all>()that will let us do some manipulation with the string returned (before we send the payload) and allow that to coerce the input we send in.- The
recvfunctions will return a BYTES object, so you will need to do some clever manipulation of said strings that are returned. This will probably take a few iterations and permutations to get the value in the right format. - Note that the C file is using
scanfto read in a hexadecimal number, meaning you don’t need to use p64(). You are sending in the string representation of a hex number, that means without the0xin the beginning. Also, you send the string directly on the command line likeffaabbccddorf701234abcd!
Your task is going to be:
- Get the value leaked from the program
- Modify it with the offset of the
system()function - Fill in the remaining byte with a random value
- Send to the process
- (Repeat until you get a flag)
- Note: we recommend using
recvall()after you send in each payload, and writing your loop logic around the output (see other flags for what kind of string output you can expect) to see if you got the right value!
02_p4s5w0rd
STRINGS!
Now it’s time to learn a really useful technique to find all the available strings in a program.
And by strings, we mean any collection of printable characters that exist in the binary. So things like variable names, hardcoded paths, debug messages, or eeeeevenn.... passwords? Hopefully not in a real program, but you would be surprised.
This binary has zero debugging information and you do not have the source code available, but guess what? The program is written terribly and is very unsafe, with passwords stored in plaintext that can easily be dumped or searched in the binary!
We recommend running the program once or twice to see what it’s doing (checking a series of responses to questions), and if you get every question right, then you will get the flag!
To get the strings for the program, run the command:
$ strings flag
This will output it all to the terminal (stdout) which isn’t super helpful, so we suggest redirecting output to a file like:
$ strings flag > flag_str
Now you will be able to grep/search/navigate the file in a new terminal and will (hopefully) be able to figure out what the correct responses would be for the given questions.
Hint: strings are stored in the binary in the order that they’re written in the C code. Therefore, it might be a good idea to search for the questions they’re asking.
Good luck!
02_the_server_client_one
This flag shows a communication between a server and a client. The client binary (flag) will send data to the server, and the server appends some (very conveniently structured) data to that message and sends it back to the client. Your goal for this task is to have the server return the ideal data to overwrite the instruction pointer with the data that is returned from the server.
Follow the same steps in previous tasks (buffer_overflow_2, more specifically) to break the program in gdb, and then figure out your buffer size, and try to fill in the response to correctly hit this function call!
If you use the pwntools e.py file, it will start the server for you so there is no need to explicitly start the server.
If you are running the program on the command line to experiment, then you must start the server each time you run the binary. You can either open a new terminal, and run
./server
Or in the same terminal, by running the server in the background:
./server &
Your task is to figure out the breaking point, and heavily inspect the last bytes that are returned from the server in order to get the right return and get the flag!
03_XORbius
Time to rev up those Reverse Engineering motors, because you need to unravel the logic that this program is checking against in order to get to the call_me() function!
No buffer overflow this time, you just ‘simply’ need to input the right values that will correctly decode the logic and pass the checks.
If you’re unfamiliar with C operators, this tutorial has all the necessary operations detailed.
We suggest pen and paper for this one to work through the logic by hand, or a ton of experimentation to get the right value!
03_pointy_pointy_point
We see there is an unsafe() function which has some checks for different local variables. The positioning of these variables is important because they are declared before the input buffer, which means that a buffer overflow will cause data to be overwritten.
You will find additional details on this flag in the readme file of the folder. This program is a buffer overflow, however, you will not be changing the control flow to a specific binary address. Instead, you will need to enter the right values to trick the pointer arithmetic logic and get to the call_me() function.
03_hunt_then_rop (x86-64 Version)
If you have an Apple Silicon Mac, go to the next section.
You’ve made it! You are now on your final task. In this directory is the entire contents of /usr/bin, a collection of binary files that make up a lot of common linux uses. One of these files has been overwritten by a vulnerable program. It is your task to figure out which one. You are given a list of checksum values that are known good, so your first task will be determining the sha256 hash of all of the files in this directory, and then finding the one that does not match. You are free to do this however you would like. NOTE: in your scripting method, ignore the files checksums and user.txt. They will likely report a mismatch, but you can be certain that neither is the file in question.
Once you find the file, it is time to begin our exploit of that file. This is a bit more complex than the other flags and will require a full ROP (return oriented programming) exploit to chain calls together, and we will also need a new tool called Ropper to find a ‘gadget’ in order to supply a function argument and pass a specific check.
In 64-bit programs, the function gets arguments through registers. The rdi register supplies the first function argument.
So we need to find a gadget (a piece of code that we can override the instruction pointer with, that will perform a certain action and then continue with the control flow hijack) that will pop a value from the stack into the rdi register.
Let’s use ropper like this:
$ ropper --file flag | grep "pop"
This will give you all gadgets within the binary that have a pop instruction (spoiler, there’s a LOT of them). An objective for this task is to figure out what gadget will likely work best to get the required argument passed into the function you are trying to call. This writeup is a helpful reference to understand the calling conventions of x86-64 CPUs.
Note the addresses that are output for each gadget. Once you find a gadget you think will work, we will need that as our first override value in pwntools.
Visually, this is what our crafted exploit needs to look like (remember the stack grows down):
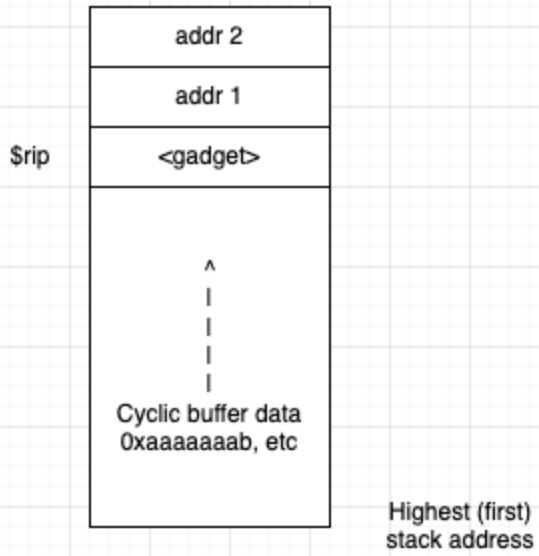
Now we will need to supply the argument (which will be on the stack immediately after our pop gadget), figure out what that value needs to be, and add it as p64(<value>) after the pop gadget.
Then, we need to put the address of the function as the next call. Use objdump or gdb to find the addresses (you should probably get the second function address while you’re at it). The call to our pop gadget will ret and then hit this second function call to enter one of the unsafe functions.
Finally, we need to finish our execution chain by calling the second function which will allow for exploitation. Append that address to your chain and see if you get a flag!
03_hunt_then_rop (ARM Version)
You’ve made it! You are now on your final task. In this directory is the entire contents of /usr/bin/, a collection of binary files that make up a lot of common linux uses. One of these files has been overwritten by a vulnerable program. It is your task to figure out which one. You are given a list of checksum values that are known good, so your first task will be determining the sha256 hash of all of the files in this directory, and then finding the one that does not match. You are free to do this however you would like. NOTE: in your scripting method, ignore the files checksums and user.txt. They will likely report a mismatch, but you can be certain they are not the files in question.
Once you find the file it is time to begin our exploit of that file. This is a bit more complex than the other flags and will require a full ROP (return oriented programming) exploit to chain calls together, and we will also need a new tool called Ropper to find a ‘gadget’ in order to supply a function argument and pass a specific check.
In 64-bit ARM CPUs, the x0 register supplies the first function argument.
So we need to find a gadget (a piece of code that we can override the instruction pointer with, that will perform a certain action and then continue with the control flow hijack) that will pop a value from the stack into the appropriate register. A helpful reference here should show you which registers might be useful to you. We want a gadget that will use the ldr (load register) instruction to access something from the stack pointer sp.
Use ropper like this (see screenshot for example output):
ropper --file flag | grep "ldr"
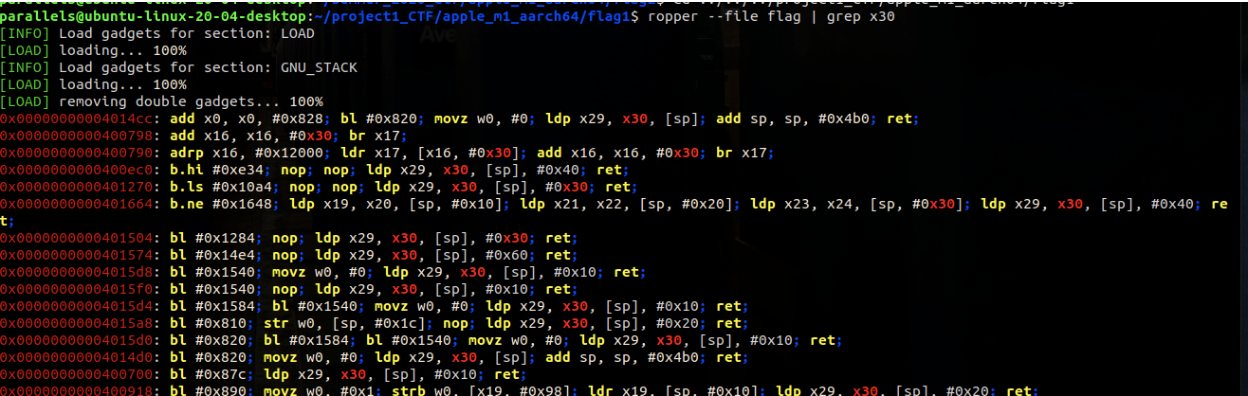
Your job is to find and pick a gadget that will perform the necessary task of loading the register with the specific argument value. Then, we also need to perform a load operation to the link register (lr) containing the return address so that we can then call the function.
Visually, this is what our crafted exploit needs to look like (remember the stack grows down):
Now we will need to supply the argument (which will be on the stack immediately after our pop gadget), figure out what that value needs to be, and add it as p64(<value>) after the pop gadget.
Then, we need to put the address of the function as the next call. Use objdump or gdb to find the addresses (you should probably get the second function address while you’re at it). The call to our pop gadget will ret and then hit this second function call to enter one of the unsafe functions.
Finally, we need to finish our execution chain by calling the second function which will allow for exploitation. Append that address to your chain and see if you get a flag!
Rubric
This project is worth 15% of your grade.
There are a total of 110 points for this project. If you complete all flags and get all 110 points, you get an extra 10% of the project applied to your grade.
That is, if you complete all flags, you will get an effective extra credit of 1.5% to your final course grade.
| Flag | Points |
| 00_intro | 0 |
| 01_basic_overflow_1 | 10 |
| 01_basic_overflow_2 | 10 |
| 02_assemble_the_assembly | 15 |
| 02_bad_rando | 15 |
| 02_p4s5w0rd | 15 |
| 02_the_server_client_one | 15 |
| 03_hunt_then_rop | 10 |
| 03_pointy_pointy_point | 10 |
| 03_XORbius | 10 |
| Total % Possible | 110 |
Submission Details
The contents of the submission file should be the following. There is a ~/project_ctf.json file in your VM with a template set up, or you can copy-paste this to your newly created project_ctf.json file elsewhere and replace the placeholders with the flags you retrieve from each relevant task. (The name of the file doesn’t matter.)
Note: You can use TextEdit or Vim to create and edit this file. Do not use LibreOffice or any word processor. It must be in proper JSON format with no special characters in order to pass the autograder. However, these word processors are likely to introduce special characters.
If you can’t find the file in the VM, just copy this format below:
{
    "00_intro": "<copy flag here>",
    "01_basic_overflow_1": "<copy flag here>",
    "01_basic_overflow_2": "<copy flag here>",
    "02_assemble_the_assembly": "<copy flag here>",
        "02_bad_rando": "<copy flag here>",
    "02_p4s5w0rd": "<copy flag here>",
        "02_the_server_client_one": "<copy flag here>",
    "03_hunt_then_rop": "<copy flag here>",
        "03_pointy_pointy_point": "<copy flag here>",
    "03_XORbius": "<copy flag here>"
}
An example of what the submitted file content should look like:
{
 "00_intro": "4ec60c3e084d8387f0f33916e9b08b99d5264a486c29130dd4a5a530b958c5c0f1faeaca2ce30b478281ec546a4729f629b531a86cb27d86c089f0c542",
 "01_buffer_overflow_1": "f496d9514c01e8019cd2bc21edfeb8e33f4a29af14a8bf92f7b3c14b5e06c5c0f1faeaca2ce30b478281ec546a4729f629b531a86cb27d86c089f0c442",
 "01_buffer_overflow_2": "b621bba0bb535f2f7a222bd32994d3875bcfcad651160c543de0a01dbe2e0c5c0f1faeaca2ce30b478281ec546a4729f629b531a86cb27d86cf0c49542",
 (etc)
}
Appendix
Note: currently, this only applies to the x86-64 VM.
There is an experimental instructional tool we have created to guide you through the flow of some of these flags, and give you an introduction to GDB and pwntools in a way that allows you to learn by doing!
You can start the program by
$ cd ~/project_ctf
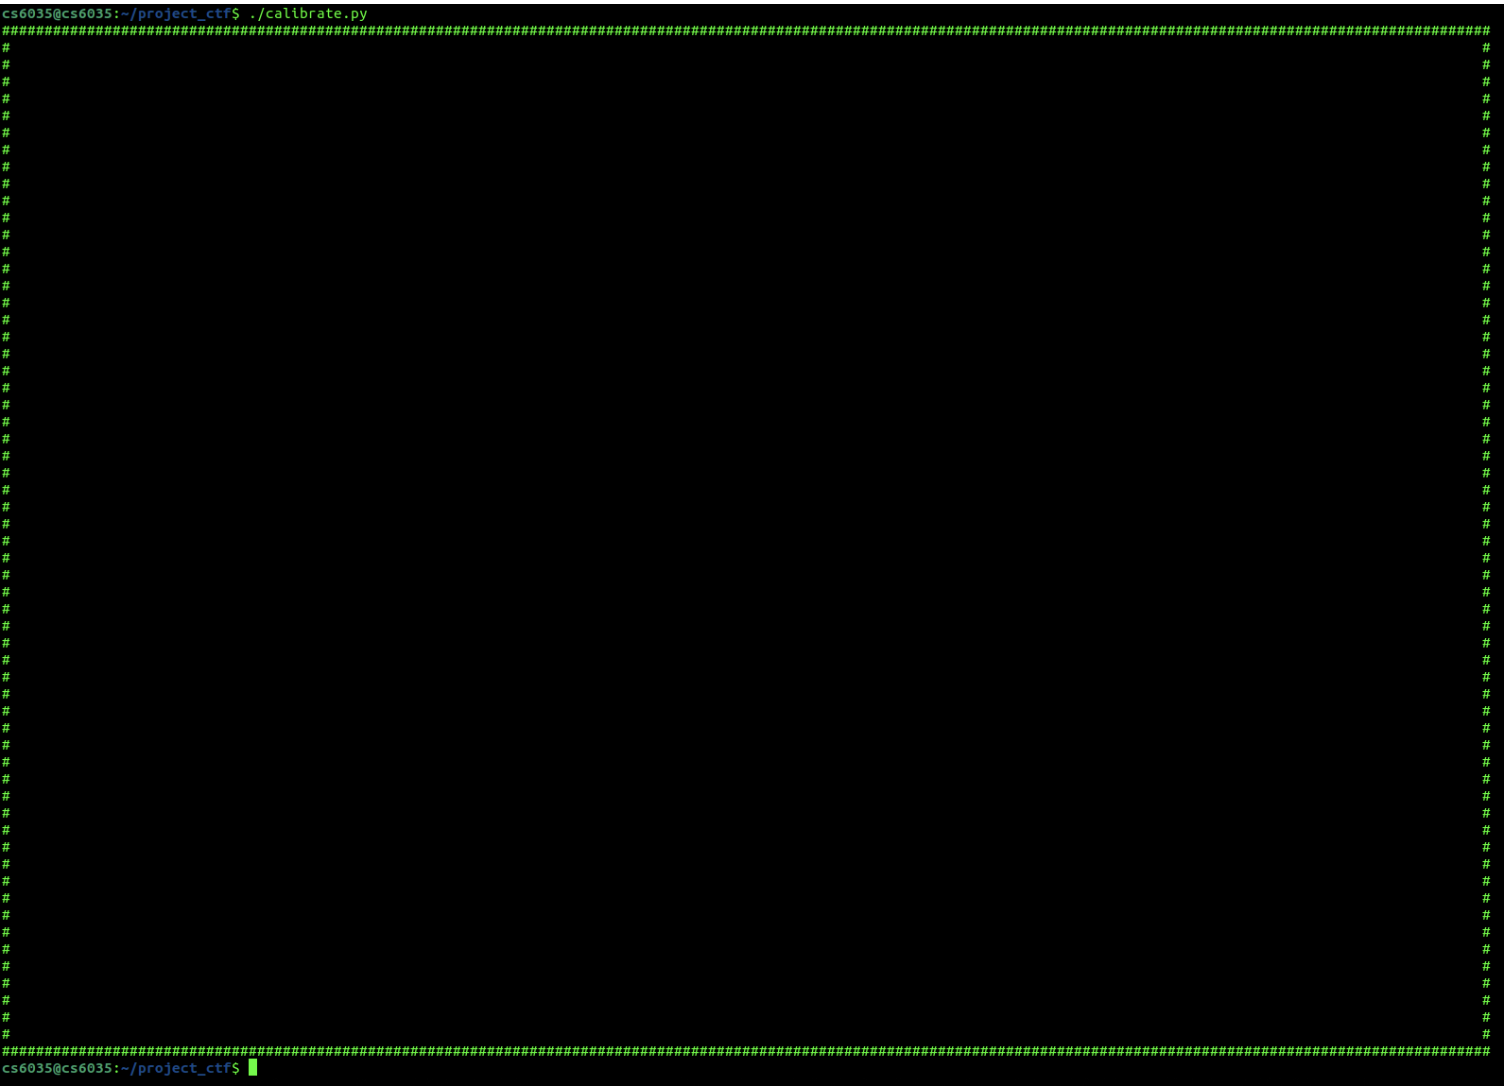
$ ./calibrate.py
Make sure your window at a minimum will show the # symbols on top/bottom/left/right. If you have the resolution, feel free to make it bigger, as it should enhance the readability.
Once your terminal is set up, run
$ tmux
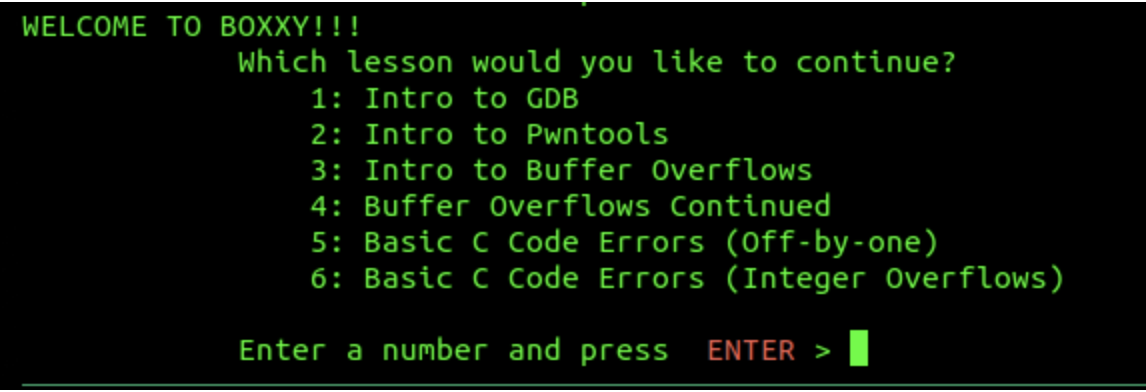
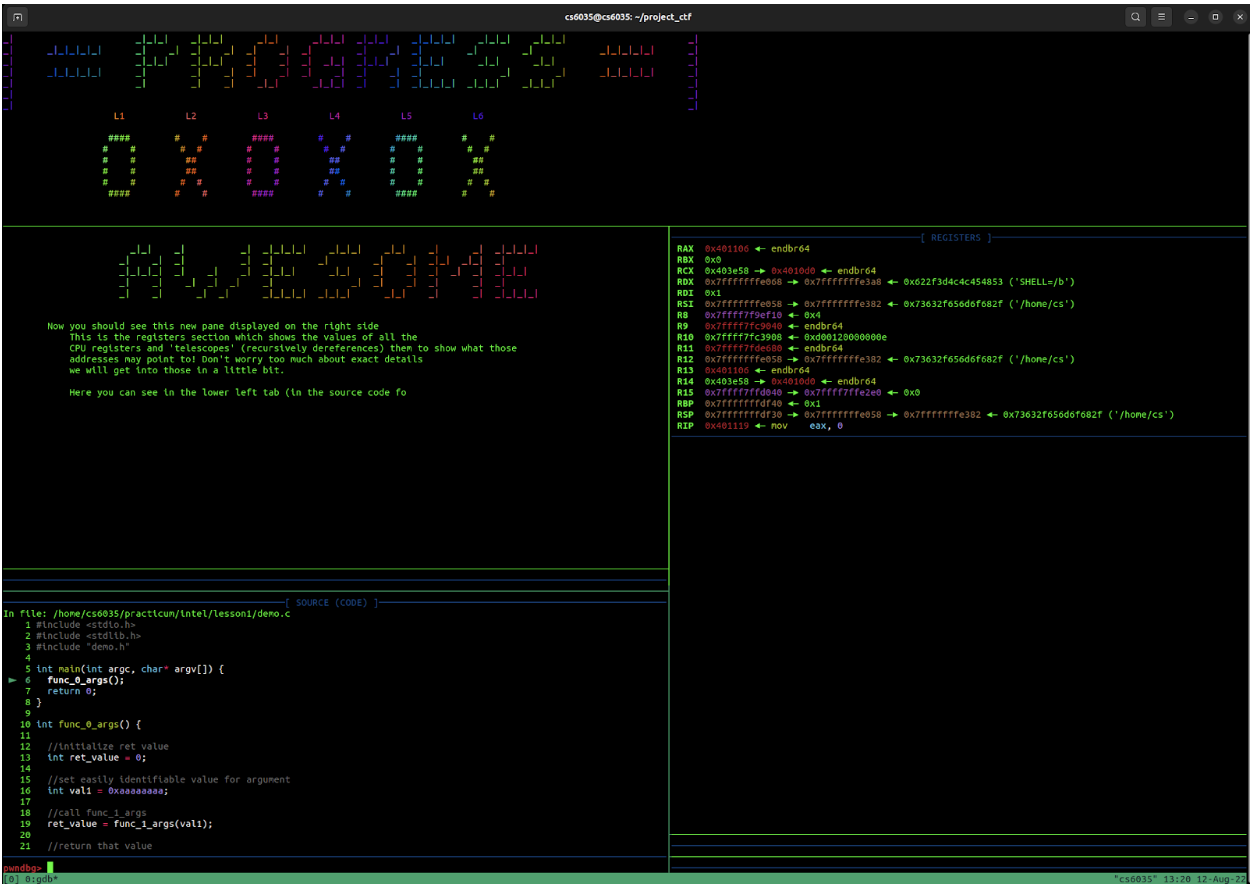
$ ./boxxy.py
You will be asked which lesson you want to start. We would suggest going through all of them, but you are free to start wherever you want. (Note: once you start a section, there isn’t currently an easy way to navigate through the other sections.)
So long for now!
