Project 3: NetworkingFall 2023
This project counts for 14% of your course grade. Late submissions will be penalized by 15% of the maximum attainable score. If you or your partner have a conflict due to travel, interviews, etc., please plan accordingly and turn in your project early.
This is optionally a group project; you may work in teams of two and submit one project per team. You may also work alone.
The code and other answers you submit must be entirely your team’s own work, and you are bound by the Honor Code. You may discuss the conceptualization of the project and the meaning of the questions, but you may not look at any part of someone else’s solution or collaborate with anyone other than your partner. You may consult published references, provided that you appropriately cite them (e.g., with program comments). Visit the course website for the full collaboration policy.
Your code for this project must be written in the version of
Go which ships with the Docker container for this project.
You may only use standard libraries that
ship with Go or modules that we either explicitly permit or include in
the starter code. Completing the Tour of Go (especially contents in the Basic section) will provide the base knowledge necessary to complete the coding portions of this project.
In the scope of this project, the term “IP address” refers to the IPv4 protocol only. Although IPv6 usage continues to grow, IPv4 remains the dominant protocol used to route Internet traffic today.
Solutions must be submitted via the Autograder, following the submission details at the end of this spec.
Introduction
This project will introduce you to network protocols, to network packet trace analysis, and to common network attacks.
Objectives
- Gain exposure to core network protocols and concepts.
- Learn to apply manual and automated traffic analysis to detect security problems.
- Understand offensive techniques used to intercept and manipulate network traffic.
- Understand the mechanics of man-in-the-middle attacks.
Setup
You will be using Docker to complete this project which you set up in the Cryptography project. However, if you haven’t already, follow our Docker guide to learn how to set up Docker on your computer.
Prior to setting up the environment for this project, ensure that the Docker container for Lab 3 is powered off. This is because both containers contend on a network port to display Wireshark through your web browser, causing container creation to potentially fail.
- To get the code for this project, create a repo using the GitHub template. Make sure to make this repo private.
- Clone the repo onto your system (you’ll need to supply your GT credentials for this), then open it in VS Code.
- If you successfully set up Docker in the previous project/labs, you should be greeted with a pop-up in the bottom right asking you to re-open the directory in the development container; do so now!
- After some time taken to build the container, you should be greeted with the project files in a directory and a terminal connected to the container (as shown in the Docker guide).
If you’re unfamiliar with using Git/GitHub, check out this guide to help you get started.
If you’re having trouble at this point, please come to office hours or put up a post on Piazza describing in as much detail as possible what is going wrong—having a working Docker installation is essential for the course.
Recall that the Docker container for this project must be opened through VS Code while Docker Desktop is running in the background. If the container is manually launched through Docker Desktop’s GUI, we cannot guarantee that the project environment will work as designed.
Once you’ve setup Docker and cloned your repo to your machine, check that you have the following starter files and directories:
-
Logistics:
Dockerfile,docker-compose.yml,go.mod,go.sum,network(a folder with all environment set up files) andREADME.md -
1:
part1.txt -
2:
detector/detector.go -
3:
mitm(a folder with all the startercode and test programs for this task),correct_mitm_output.txt
Resources
Primer Video (Important!)
Before you begin the project, ensure that you watch the following video. It will contain many useful tips to help you along the project.
Slides for the videos can be found here:
Ethics
This project asks you to perform attacks, with our permission, against controlled and simulated environments. Attempting the same kinds of attacks against other networks without authorization is prohibited by law and university policies and may result in fines, expulsion, and jail time. You must not attack any network without authorization!
Part 1: Exploring Network Traces 40 pts
Both security analysts and malicious attackers frequently study network traffic to search for vulnerabilities and characterize network behavior. In this section, you will examine a network packet trace (commonly called a “pcap”) that we recorded on a sample network set up for this assignment. You will search for specific vulnerable behaviors and extract relevant details using the Wireshark network analyzer.
Wireshark ships with the Docker container provided for the project.
After you open the project in the container in VS Code, you can navigate to
http://localhost:4235 in your browser to use Wireshark.
If you use Windows and WSL or WSL 2, create your project folder in a WSL
directory rather than in a mounted Windows directory
(i.e. your project folder should not be accessed at /mnt/… in WSL).
Using a mounted directory incurs massive overhead in reading from files,
which may make Wireshark extremely slow.
To get started, download your unique pcap file from networking.gtinfosec.org to your project folder and open it using Wireshark. Putting the pcap file to your project folder is important, because the Docker container cannot see the rest of your host OS’s filesystem outside its working directory. (The file will be in a compressed (gzipped) format, but you’ll be able to open it directly in Wireshark without extracting.)
Familiarize yourself with Wireshark’s features and explore the various options for filtering and reconstructing data streams. (Here’s a guide of Wireshark to look at if you are not too familiar https://www.javatpoint.com/wireshark) Then, concisely answer the questions below.
Tasks
Write all answers in the provided questionnaire which comes along with the starter files (part1.txt). The line number for each task’s responses is indicated in bolded brackets before each question. Please leave a space between the colon (:) and your answers. Otherwise, the autograder might not be able to grade your answers.
Your submission must follow the exact format as stated below to earn points for each question. You will be able to see from the Autograder if your submission has earned points or failed for each test case. However, as was the case with previous projects/labs, your group will be limited to 20 submissions per day.
- [Line 1] Write the GT username you used to download the unique pcap file.
-
There are no more than five devices actively communicating on the local area network. What are their MAC and IP addresses?
-
For each device identified, classify its functionalities:
- Router
- Printer
- Windows device
- Android device
- Apple device
- Modem
- DNS server
- Security camera
- DHCP server
[Lines 3-17] Write the answers for Question 1 & 2 in lines 3-17 of
part1.txtas specified in the questionnaire. The sequence of devices found does not matter. If you find devices with multiple functionalities, write all functionalities in the same line separated by commas (,). You answers need to be exactly the same as the choices above to get points.Sample answer:
Device 1 IP: 10.2.42.35 Device 1 MAC: 15:4e:9a:a8:f2:3b Device 1 Classification: Apple device,Modem -
Over approximately what period of time was this pcap captured?
- 10 days
- 10 hours
- 10 minutes
- 10 seconds
[Line 18] Write the answers for Question 3 in line 18 of
part1.txt. You answer need to be exactly the same as one of the choices above. -
Select the packet components that appear in the pcap unencrypted:
- HTTP/1.0 data
- HTTP/1.1 data
- HTTP/2 data
- TCP handshake
- TCP payload data
- TLS handshake-supported algorithms and keys
- TLS application data
[Line 19] Write the answers for Question 4 in line 19 of
part1.txt. You answers need to be exactly the same as the choices above. Each component should be separate by semicolons (;).Sample answer:
Question 4 packet components: HTTP/1.0 data;HTTP/1.1 data;HTTP/2 data -
The trace shows that at least one of the clients makes HTTPS connections over TLS 1.3. Pick one of these connections and answer the following:
-
In the majority of cases, the client must transmit the domain name before it can initiate the HTTPS connection. For the connection you chose, in which packet number does this occur and what is the domain name? (If you’re unable to locate this, you may want to pick another connection.)
-
What cipher suite does the server choose for the connection? Include the packet number where this is found.
[Lines 20-23] Write the answers for Question 5 in lines 20-23 of
part1.txt. Your answer for this question needs to include the packet number and domain name for part a and the packet number and cipher suite for part b.Sample answer:
Question 5.a packet number: 12345
Question 5.a domain name: domain.com
Question 5.b packet number: 54321
Question 5.b cipher suite: crypto_suite
As you will notice, much of the data in the pcap is encrypted and therefore unreadable by passive eavesdroppers on the network. However, certain traffic can be decrypted when the appropriate secrets are known. Indeed, when capturing this pcap, we turned on a special browser setting to log some of these secrets.
Download this keylog file to your project folder, and in Wireshark, go to Preferences -> Protocols -> TLS and change the (Pre)-Master-Secret log filename setting to the path of the file. (Some browsers might open the keylog as plain text instead of downloading the file. You might need to save it as a file by pressing Ctrl+S or ⌘+S)
As in the case of the pcap file, the keylog file must be placed in the project directory, since the Docker container is isolated from the rest of the host OS’s filesystem outside of that directory.
-
-
Select the packet components that appear in the pcap unencrypted:
- HTTP/1.0 data
- HTTP/1.1 data
- HTTP/2 data
- TCP handshake
- TCP payload data
- TLS handshake
- TLS application data
[Line 24] Write the answers for Question 6 in line 24 of
part1.txt. You answers need to be exactly the same as the choices above. Each component should be separate by semicolons (;).Sample answer:
Question 6 packet components: HTTP/1.0 data;HTTP/1.1 data;HTTP/2 data;... -
One of the clients tries to login as someone on Facebook. What is their email?
[Line 25] Write the answers for Question 7 in line 25 of
part1.txt. You answers need to be exactly the same as within the pcap file.
What to submit
Submit your answers to the Autograder. You’ll be able to see the Pass/Fail status for each test case to aid debugging on formatting errors. As before, your group can make up to 20 submissions per day.
To ensure your submission is properly graded, we recommend designating one group member as the lead on this part. Both partners can then use that person’s GT username when downloading their own copies of the pcap file and working together.
Part 2: Anomaly Detection 20 pts
In Part 1, you manually explored a network trace. Now, you will programmatically analyze a pcap file to detect suspicious behavior. Specifically, you will be attempting to identify port scanning and ARP spoofing.
Port scanning is a technique used to find network hosts that have
services listening on one or more target ports. It can be used
offensively to locate vulnerable systems in preparation for an attack,
or defensively for research or network administration. In one kind of
port scan technique, known as a SYN scan, the scanner sends TCP SYN
packets (the first packet in the TCP handshake) and watches for hosts
that respond with SYN+ACK packets (the second handshake step).
Since most hosts are not prepared to receive connections on any given
port, typically, during a port scan, a much smaller number of hosts will
respond with SYN+ACK packets than originally received SYN packets.
By observing this effect in a packet trace, you can identify source
addresses that may be attempting a port scan.
ARP spoofing is an attack that exploits the Address Resolution Protocol (ARP), the scheme used to discover the MAC address associated with a given IP address within a network. When Device A needs to send a packet to Device B on the network, it initially only knows the IP address of Device B and needs to determine Device B’s MAC address. If Device A does not have this information already, it broadcasts an ARP packet to all computers on the local network, asking which device is associated with the IP address for Device B. Normally, Device B would respond with an ARP reply message containing its MAC and IP addresses. Device A then caches this information before sending the packet.
Because ARP packets are not authenticated, any device can claim to have any IP address. Furthermore, most network devices automatically cache any ARP replies they receive, regardless of whether they were ever requested in the first place. In an ARP spoofing attack, the attacker repeatedly sends unsolicited replies claiming to control a certain address with the aim of intercepting data bound for another system, thereby performing a man-in-the-middle or denial-of-service attack on other users on the network.
Your task is to develop a Go program that analyzes a pcap file in
order to detect possible SYN scans and ARP spoofing attacks. To do
this, you will use gopacket, a library for packet manipulation and
dissection. gopacket ships with the Docker container for the project.
You can find more information about gopacket at
https://godoc.org/github.com/google/gopacket. For more specific information regarding components of gopacket, follow the following links to read more. Packet, PCAP, Layers. Feel free to use the search bar where it says “Jump to …” to look for information within the website.
Your program will take the path of the pcap file to be analyzed as a command-line argument, e.g. (run from the project’s root):
$ go build ./detector.go
$ ./detector sample.pcap
$ go run ./detector.go sample.pcap
The printed output should begin with the line
Unauthorized SYN scanners:, followed by the set of IP addresses (one
per line) that sent more than 3 times as many SYN packets as the
number of SYN+ACK packets they received and also sent more than 5 SYN
packets in total. In calculating this, your
program should silently ignore packets that are malformed or that are
not using Ethernet, IP, and TCP. The line immediately following these IP
addresses should print the line Unauthorized ARP spoofers:, followed
by the set of MAC addresses (one per line) that send more than 5
unsolicited ARP replies. Unsolicited replies are those which contain a
source IP and target MAC address combination that does not correspond to
a previous request (each request should correspond to at most one
reply).
A large sample pcap file captured from a real network can be downloaded at https://files.gtinfosec.org/sample.pcap. (You can examine the packets manually by opening this file in Wireshark.) For this pcap file, your program’s output should match the following, with the addresses in each section in any order:
Unauthorized SYN scanners:
128.3.23.2
128.3.23.5
128.3.23.117
128.3.23.150
128.3.23.158
Unauthorized ARP spoofers:
7c:d1:c3:94:9e:b8
14:4f:8a:ed:c2:5e
What to submit
Write a program in Go that accomplishes the task specified above and submit it to the Autograder as detector.go. You should assume that gopacket is
available, and you may use standard Go libraries, but your
program should otherwise be self-contained. We will grade your detector
using a variety of different pcap files.
Part 3: Man-in-the-Middle Attack 40 pts
Some of your friends at the Scheller School of Business have decided to open up a bank. However, in order to cut costs, they employed students who have not taken cs 3235 to build their website. Not knowing about the benefits of encryption, the students served the website over plaintext HTTP.
After a few weeks, your friends notice that bank clients are mysteriously seeing their funds transferred to the wrong account. Coming to their senses, they decide to hire you, a clever cs 3235 student, to diagnose the problem. Appalled at the use of HTTP in a banking site, you suggest that someone is man-in-the-middling the users’ connections. Your Scheller friends scoff at you, rolling their eyes and declaring this IMPOSSIBLE. Your goal is to build a program that demonstrates such an attack against the banking site, to prove that this is a real security problem.
Your friends have provided the framework of a sample network for you to attack, which consists of a DNS server, the bank’s HTTP server, and a simple client simulating the actions of the average bank customer. Expecting your attack to go nowhere, they have even provided starter code for you to use in devising your attack.
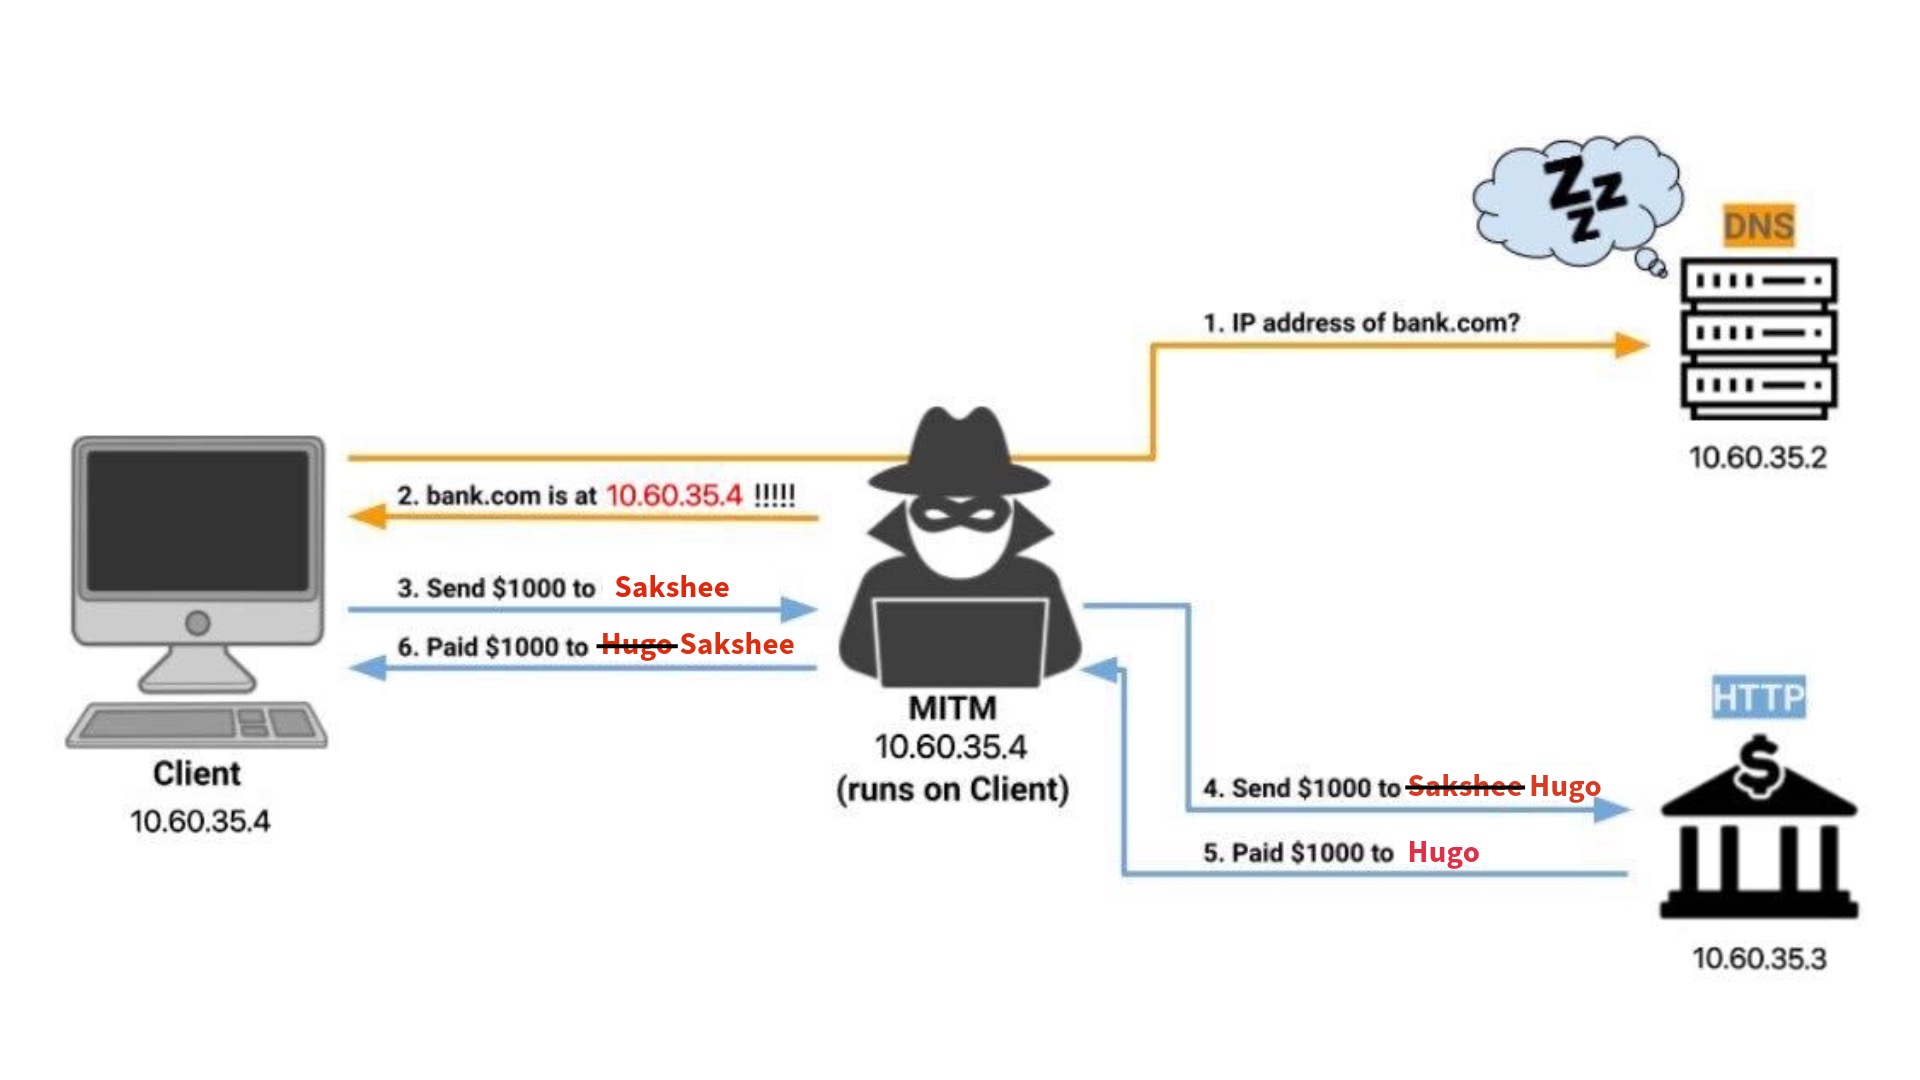
Vulnerabilities
The vulnerabilities that you will be exploiting during this attack are the lack of authentication in DNS and the lack of encryption in plain HTTP. Since DNS is not authenticated, anyone is able to respond to a DNS request that they see going over the wire. This means an attacker positioned in the network can respond to a DNS request with a false address, thereby tricking clients into connecting to the wrong IP address for the domain. Combined with the fact that HTTP is unencrypted and unauthenticated, any attacker can secretly intercept and even modify communication between two parties who think they are communicating with each other directly, in what is known as a man-in-the-middle attack.
Your job is to create a program that exploits these vulnerabilities to meet the requirements below.
Requirements
DNS When the client queries a DNS A record for bank.com, your program
should send a spoofed response containing the attacker’s address.
You should send this response in under 2 seconds, so as to beat the real
DNS server’s response. You should ignore DNS queries for
other names or record types.
To help with troubleshooting, we made it so that the real DNS server
never responds. Therefore, when your program fails to send a valid DNS
response, DNS resolution will fail, and the client will crash during login with an
error such as i/o timeout or Answer to DNS question not found.
Tip: You may want to temporarily modify the DNS server so that it does respond and then observe what happens, in order to better understand the nature of the attack.
HTTP Your program should listen for HTTP requests, forward them to the bank server, and return the response from the server back to the client. In doing so, you should satisfy the following snooping and spoofing guidelines:
-
Whenever a client makes a POST request to the bank’s
/loginendpoint, your program should steal the credentials, which are the values of theusernameandpasswordparameters in the body, by sending them to thethievery.StealCredentialsfunction. -
Whenever the client makes a POST request to the bank’s
/transferendpoint containing atoparameter in the body, your program should change the value toHugowhen forwarding this request to the bank. When responding to the client, your program should reverse this change, so that any occurrences ofHugoin the response body are reverted to the value which the client actually sent. -
Whenever the client makes a GET request to the bank’s
/downloadendpoint, your program should steal any file that the server provides by sending it to the file handler provided by thethievery.StealFilefunction. Make sure to call this function with the filename specified by the server.
If you’ve implemented this correctly, you should see a stolen file appear in theintercepted_filesdirectory! -
For all other endpoints, your program should forward traffic as-is without modification, just like a proxy server.
-
For any request made by the client, your program should steal any and all cookies sent by the client or set by the server. That is, any time the client sends the
Cookierequest header, or the server responds with theSet-Cookieheader, your program should send the cookie name and value to thethievery.StealClientCookieorthievery.StealServerCookiefunctions, respectively. -
Whenever your program receives any request to the
/killendpoint, your program should exit immediately by callingos.Exit(1). This is already implemented in the starter code.
Technicalities
As mentioned above, you have been provided starter code to help in demonstrating the attack. You are free to make any modifications to this starter code as you deem necessary, provided that you follow the requirements above and these miscellaneous rules:
-
You are required to import and use the functions contained in the
bank.com/mitm/networkandbank.com/mitm/network/thieverypackages. (Typingnetwork.…orthievery.…will cause them to be automatically imported). Do not hardcode their implementations into your program, as they may differ on the autograder. -
Apart from the
bank.com/mitm/networkandbank.com/mitm/network/thieverypackages described above, you may only import from the Go standard libraries or gopacket. -
You may not assume any additional details about the network’s topology or functionality, beyond what is described in this spec. This includes any details about the IP addresses of devices on the network, or what happens when any of the
network.orthievery.functions are called.
Testing Your Solution
Unit Testing
Because your Scheller friends are so confident about your inability to perform this attack, they have provided basic unit tests for certain functions in the starter code based on the behavior they believe correct implementations of these functions will exhibit.
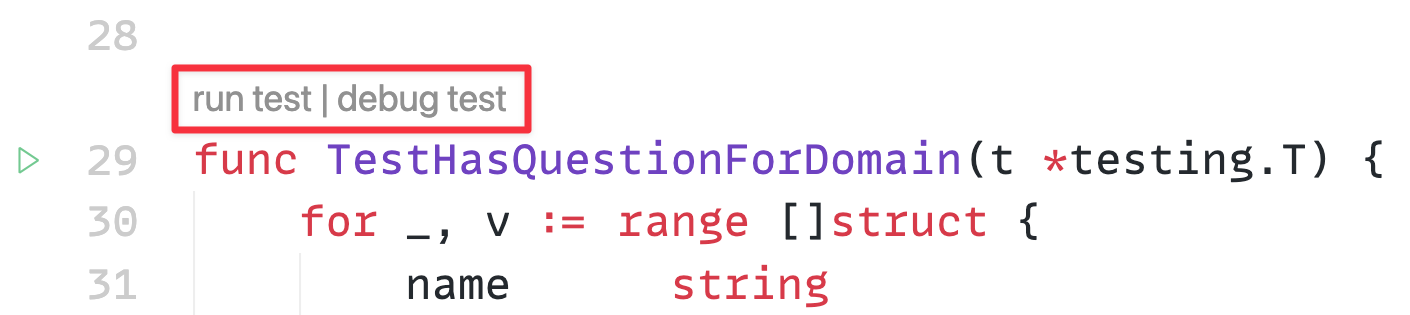
You can run these tests by clicking “run test” on any of the test functions in VS Code. (You can also click “debug test” to run the test in your visual debugger—this comes fully set up in Docker right out of the box!)
Running go test . inside the mitm folder will run all tests at once.
Understanding what these unit tests are doing will be extremely useful in successfully implementing these functions; spend some time looking them over. Note that these tests are not necessarily comprehensive. You are more than welcome to add additional tests.
Full-flow Testing
You will be using Docker to simulate a basic network within your computer. Docker allows you to run applications in isolated environments locally, similar to virtual machines, but without the overhead required by VMs to completely virtualize your system’s hardware in each environment.
To run your solution, run the following command within the Docker container for the project:
$ docker compose up --build
If the command gives you trouble, try running sudo docker system prune.
This will clean up files related to previous instances, in case they are causing
any issues with the build process.
If your program is fully implemented, you should see output as described in
correct_mitm_output.txt which can be find in your startercode repository. Don’t worry if you see extra output before the
STAGE 1/6 line or after the exit status 1 line.
To help with debugging your solution, all packets within the network will be saved to mitm.pcap,
which you can inspect via Wireshark.
What to submit
Write a set of programs in Go that accomplishes the task specified above and submit it to the Autograder as mitm.go, http.go, and dns.go. On the Autograder, the grades for Part 3 may take significantly longer to appear than the previous parts. This is normal – don’t worry!
Submission Details
-
Create a repo using the GitHub template. Make sure that the repo you create is private.
-
Visit the project on the autograder, and optionally create a team. Ensure that only one team member makes submissions to the Autograder to avoid confusion.
-
Submit the following items by the deadline:
- Your answers for packet analysis using Wireshark. (
part1.txt) - Your Go source code for
SYNscan and ARP spoof detection. (detector.go) - Your Go source code for the MITM attack. (
mitm.go,http.go,dns.go)
- Your answers for packet analysis using Wireshark. (
Troubleshooting
This is where we’ll post guides to commonly encountered issues on a rolling basis, as we address questions from office hours and Piazza.
Socket Permission Error on Linux Hosts
If you are running Linux as your host operating system and encounter the following error:
Got permission denied while trying to connect to the Docker daemon socket at unix:///var/run/docker.sock: Get "http://%2Fvar%2Frun%2Fdocker.sock/v1.24/containers/json?all=1&filters=%7B%22label%22%3A%7B%22com.docker.compose.project%3Dnetworking%22%3Atrue%7D%7D&limit=0": dial unix /var/run/docker.sock: connect: permission denied
Please run the following command:
$ sudo chmod 666 /var/run/docker.sock
However, if the error is not resolved after changing permissions as the above, please make a Piazza post.